Creating a Windows .ISO USB Stick on MacOS
🖥️ It’s easy, right?
If you’re working on a Windows 10 or 11 PC, it’s easy to create a Windows Installation Media right on Microsoft’s website or by using a software like Rufus to burn a Windows .ISO to a USB stick… but try to doso on Linux or MacOS and yer in for a task!!
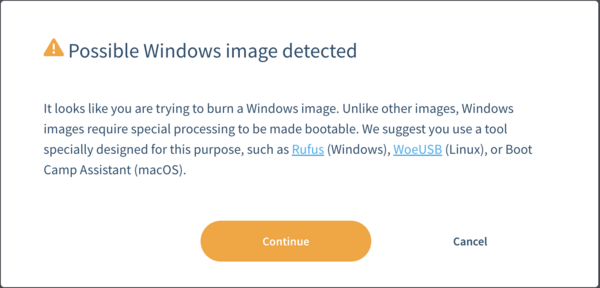
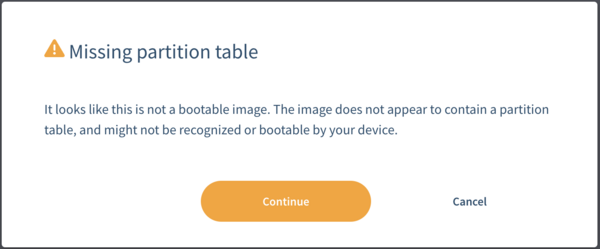
Both OSes have softwares like Balena Etcher, Raspberry Pi Imager or even the terminal ‘dd’ command - but our good friend Windows don’t let that happen so easily. Balena tells us:
Windows 10:

Windows 11:

… in other words, unless you use Windows they’re gonna make it as hard as possible for you to burn a bootable Windows USB stick. Not to worry, TechHeart has you covered! Let’s learn the easiest way to get the job done so you can get Windows 10 or 11 installed - we’ll use the Terminal, but I promise it’ll be simple! Let’s go!!
💿 Downloading Windows
⌨️ Creating a Windows bootable USB Stick
Now that you have your Windows 10 or 11 .ISO’s we can move forward - open a terminal and use these commands to burn your .ISO to a USB stick:
$ ls ~/Downloads/windows

Win10_22H2_English_x64v1.iso  Win11_23H2_English_x64v2.iso
First, let’s take a look at the Volumes connected to our MacOS machine before inserting a USB stick:
$ diskutil list

/dev/disk0 (internal, physical):
   #:                       TYPE NAME                    SIZE       IDENTIFIER
   0:      GUID_partition_scheme                        *28.0 GB    disk0
   1:                 Apple_APFS Container disk2         27.7 GB    disk0s2

/dev/disk1 (internal, physical):
   #:                       TYPE NAME                    SIZE       IDENTIFIER
   0:      GUID_partition_scheme                        *1.0 TB     disk1
   1:                        EFI NO NAME                 208.7 MB   disk1s1
   2:                 Apple_APFS Container disk2         1000.0 GB  disk1s2

/dev/disk2 (synthesized):
   #:                       TYPE NAME                    SIZE       IDENTIFIER
   0:      APFS Container Scheme -                      +1.0 TB     disk2
                                 Physical Stores disk0s2, disk1s2
   1:                APFS Volume iMac                    10.1 GB    disk2s1
   2:              APFS Snapshot com.apple.os.update-... 10.1 GB    disk2s1s1
   3:                APFS Volume Preboot                 3.7 GB     disk2s2
   4:                APFS Volume Recovery                1.2 GB     disk2s3
   5:                APFS Volume iMac - Data             195.9 GB   disk2s4
   6:                APFS Volume VM                      1.1 GB     disk2s5
Now you can insert your USB stick. Windows 10 requires a minimum of 5GB and Windows 11 requires 8GB - I suggest using a USB stick that is > 8GB. After inserting, you can now list the Volumes again:
$ diskutil list

/dev/disk0 (internal, physical):
   #:                       TYPE NAME                    SIZE       IDENTIFIER
   0:      GUID_partition_scheme                        *28.0 GB    disk0
   1:                 Apple_APFS Container disk2         27.7 GB    disk0s2

/dev/disk1 (internal, physical):
   #:                       TYPE NAME                    SIZE       IDENTIFIER
   0:      GUID_partition_scheme                        *1.0 TB     disk1
   1:                        EFI NO NAME                 208.7 MB   disk1s1
   2:                 Apple_APFS Container disk2         1000.0 GB  disk1s2

/dev/disk2 (synthesized):
   #:                       TYPE NAME                    SIZE       IDENTIFIER
   0:      APFS Container Scheme -                      +1.0 TB     disk2
                                 Physical Stores disk0s2, disk1s2
   1:                APFS Volume iMac                    10.1 GB    disk2s1
   2:              APFS Snapshot com.apple.os.update-... 10.1 GB    disk2s1s1
   3:                APFS Volume Preboot                 3.7 GB     disk2s2
   4:                APFS Volume Recovery                1.2 GB     disk2s3
   5:                APFS Volume iMac - Data             195.9 GB   disk2s4
   6:                APFS Volume VM                      1.1 GB     disk2s5

/dev/disk3 (external, physical):
   #:                       TYPE NAME                    SIZE       IDENTIFIER
   0:     FDisk_partition_scheme                        *31.0 GB    disk3
   1:                 DOS_FAT_32 WIN11                   31.0 GB    disk3s1
… my USB stick is located at /dev/disk3. Your’s will likely have a different name as mine is already a Windows 11 bootable media stick. Be sure to select the USB stick that is newly present to the machine as subsequent commands will completely erase the contents of the disk you enter - regardless of whether you make a mistake!! The correct disk in my case is /dev/disk3. Make note of yours.
Now, we’ll format the USB stick:
(Note: You can select GPT [GUID Partition Table] or MBR [Master Boot Record] for the partion type.)
Use MBR if:
- The target system uses BIOS or legacy mode for booting.
- The system is older and does not support UEFI.
- The USB drive will be used to boot on older machines.
Use GPT if:
- The target system uses UEFI for booting. (Most modern computers.)
On my Thinkpad T480, even though it uses UEFI, it reads MBR - most people will select GPT, but if your computer doesn’t boot with a USB stick created with GPT, try MBR…
$ diskutil eraseDisk MS-DOS "WIN11" MBR /dev/diskX

Started erase on disk3
Unmounting disk
Creating the partition map
Waiting for partitions to activate
Formatting disk3s1 as MS-DOS (FAT) with name WIN11
512 bytes per physical sector
/dev/rdisk3s1: 60597312 sectors in 1893666 FAT32 clusters (16384 bytes/cluster)
bps=512 spc=32 res=32 nft=2 mid=0xf8 spt=32 hds=255 hid=2048 drv=0x80 bsec=60626944 bspf=14795 rdcl=2 infs=1 bkbs=6
Mounting disk
Finished erase on disk3
Now we’ll mount the Windows .ISO that we downloaded earlier. Your’s will most likely be located in ~/Downloads, but mine is in ~/Downloads/windows… edit the command accordingly:
$ hdiutil mount ~/Downloads/windows/Win11_23H2_English_x64v2.iso
/dev/disk4 /Volumes/CCCOMA_X64FRE_EN-US_DV9
$ ls /Volumes/
CCCOMA_X64FRE_EN-US_DV9 iMac WIN11
Now, when viewing the contents of /Volumes, we can see the Windows .ISO [CCCOMA_X64FRE_EN-US_DV9] and our USB stick [WIN11].
Lets copy the contents of the Windows .ISO to our USB stick - however, we’ll have to exclude one file [install.wim] because it’s larger than 4GB and MS-DOS file systems can’t accept files that large. We’ll use a tool later to copy it over:
$ rsync -vha --exclude=sources/install.wim /Volumes/CCCOMA_X64FRE_EN-US_DV9/* /Volumes/WIN11

building file list ... done

(...)

sent 789.46M bytes  received 21.32K bytes  3.16M bytes/sec
total size is 789.29M  speedup is 1.00
To finish up, we have to copy over that install.wim file - to doso, we’re going to use the package manager Brew.sh. If you don’t have it installed, you can doso with the following command:
$ /bin/bash -c "$(curl -fsSL https://raw.githubusercontent.com/Homebrew/install/HEAD/install.sh)"

==> Checking for `sudo` access (which may request your password)...
Password:

==> This script will install:
/usr/local/bin/brew
/usr/local/share/doc/homebrew
/usr/local/share/man/man1/brew.1
/usr/local/share/zsh/site-functions/_brew
/usr/local/etc/bash_completion.d/brew
/usr/local/Homebrew

Press RETURN/ENTER to continue or any other key to abort:
==> /usr/bin/sudo /usr/sbin/chown -R paulie420:admin /usr/local/Homebrew
==> Downloading and installing Homebrew...
remote: Enumerating objects: 311, done.
remote: Counting objects: 100% (245/245), done.
remote: Compressing objects: 100% (67/67), done.
remote: Total 311 (delta 176), reused 237 (delta 172), pack-reused 66 (from 1)
Receiving objects: 100% (311/311), 380.40 KiB | 5.36 MiB/s, done.
Resolving deltas: 100% (180/180), completed with 91 local objects.
From https://github.com/Homebrew/brew
 * [new branch]            auto-bump               -> origin/auto-bump
 * [new branch]            cleaner-factory         -> origin/cleaner-factory
 * [new branch]            cleaner-interface       -> origin/cleaner-interface
 * [new branch]            dependabot/bundler/Library/Homebrew/logger-1.6.1 -> origin/dependabot/bundler/Library/Homebrew/logger-1.6.1
 * [new branch]            dependabot/bundler/Library/Homebrew/rubocop-1.66.0 -> origin/dependabot/bundler/Library/Homebrew/rubocop-1.66.0
 * [new branch]            depends-on-order-cop-blank-lines -> origin/depends-on-order-cop-blank-lines
 * [new branch]            docker-git-gc           -> origin/docker-git-gc
 * [new branch]            homebrew-user           -> origin/homebrew-user
 * [new branch]            info-analytics-timeout  -> origin/info-analytics-timeout
 * [new branch]            load-installed-casks    -> origin/load-installed-casks
 * [new branch]            revert-18224-revert-18188-better-shellenv -> origin/revert-18224-revert-18188-better-shellenv
 * [new branch]            skip-sorbet-assignments -> origin/skip-sorbet-assignments
 * [new branch]            sorbet-strict-random    -> origin/sorbet-strict-random
 * [new branch]            srb-strict-extend-os-linux-diagnostic -> origin/srb-strict-extend-os-linux-diagnostic
 * [new branch]            use-cask-tab-to-better-identify-installed-casks -> origin/use-cask-tab-to-better-identify-installed-casks
 * [new branch]            zsh-completions-speedup -> origin/zsh-completions-speedup
Updating files: 100% (2363/2363), done.
Reset branch 'stable'
==> Updating Homebrew...
==> Installation successful!

==> Homebrew has enabled anonymous aggregate formulae and cask analytics.
Read the analytics documentation (and how to opt-out) here:
  https://docs.brew.sh/Analytics
No analytics data has been sent yet (nor will any be during this install run).

==> Homebrew is run entirely by unpaid volunteers. Please consider donating:
  https://github.com/Homebrew/brew#donations

==> Next steps:
- Run these two commands in your terminal to add Homebrew to your PATH:
    (echo; echo 'eval "$(/usr/local/bin/brew shellenv)"') >> /Users/paulie420/.bash_profile
    eval "$(/usr/local/bin/brew shellenv)"
- Run brew help to get started
- Further documentation:
    https://docs.brew.sh
Now that we have brew, we’ll use it to install the wimlib package to our MacOS system:
$ brew install wimlib

==> Downloading https://ghcr.io/v2/homebrew/core/wimlib/manifests/1.14.4
Already downloaded: /Users/paulie420/Library/Caches/Homebrew/downloads/38c3652e2080e8f81d6d525bd958a21228b7fe08c8bd03b36c9d9000d038409c--wimlib-1.14.4.bottle_manifest.json
==> Fetching wimlib
==> Downloading https://ghcr.io/v2/homebrew/core/wimlib/blobs/sha256:77a2f91a0c2
Already downloaded: /Users/paulie420/Library/Caches/Homebrew/downloads/1b925614a5c4549c3b68354a73f110b58bbaf8b2098a57717120ce0e6b56d553--wimlib--1.14.4.ventura.bottle.tar.gz
==> Pouring wimlib--1.14.4.ventura.bottle.tar.gz
🍺  /usr/local/Cellar/wimlib/1.14.4: 65 files, 2.7MB
==> Running `brew cleanup wimlib`...
Disable this behaviour by setting HOMEBREW_NO_INSTALL_CLEANUP.
Hide these hints with HOMEBREW_NO_ENV_HINTS (see `man brew`).
We’ll create a directory to be safe; it’s normally always present on Windows 10/11 .ISOs - we’re just making sure:
$ mkdir /Volumes/WIN11/sources

mkdir: /Volumes/WIN11/sources: File exists
And finally, we can use wimlib-imagex to copy over the install.wim in pieces smaller than 4GB. Make note of its new install.swm name if you’re not copying the command:
$ wimlib-imagex split /Volumes/CCCOMA_X64FRE_EN-US_DV9/sources/install.wim /Volumes/WIN11/sources/install.swm 3800

Splitting WIM: 5698 MiB of 5698 MiB (100%) written, part 2 of 2
Finished splitting "/Volumes/CCCOMA_X64FRE_EN-US_DV9/sources/install.wim"
Your USB stick is ready to r0ck! Let’s quickly eject the Windows 11 .ISO and the USB stick:
$ diskutil eject /Volumes/CCCOMA_X64FRE_EN-US_DV9/

Disk /Volumes/CCCOMA_X64FRE_EN-US_DV9/ ejected

$ diskutil eject /Volumes/WIN11/

Disk /Volumes/WIN11/ ejected
💥 B00M!
Pull that USB stick out and boot it up in yer PC - the Windows 10 / 11 installer should pop right up and Bob’s yer Uncle!! Remember, if you run into problems try MBR or GPT as stated earlier…
You can find our quirky Tech Heart videos at the TechHeart Youtube Channel, hope this helped us Linux / MacOS head’s that Microsoft hates so much!! With the right knowledge, we don’t need no stinkin Rufus!