Create unique Ubuntu Server 22.0 Proxmox Templates
❓ Why unique ❓
When you create a Proxmox Template from an Ubuntu .ISO installation, all is good in the w0rld… it seems. You can clone that PVE template into new VMs and wouldn’t notice an issue… unless you attempt running two of those clones at once, or when attempting to SSH in to two at a later time. That’s because they will have the same DHCP IPs - and sometimes even mac addresses. (Two VMs w/ xxx.xxx.xxx.40.) As you can see, this won’t work if we’re trying to build production products… lets fix that. What we need is an Ubuntu Server install that creates user and system data after its first boot…
💾 Using an .img instead
That’s why we’re going to use an Ubuntu Cloud Image instead of installing from an Ubuntu .ISO. An .IMG is a clone of a hard disk (Or any disk, really.). We’ll use an official release image from Ubuntu and convert that into the hard disk of a VM that we’ll then convert to a Proxmox Template. When you boot from this image, or… from the Proxmox Template we’ll end up with, the user will get unique IPs and won’t have any duplicate settings that you’d get by creating the first user in an .ISO install. OK… we’re getting too deep into the woods - just know that this will get you a template that will create VMs correctly; no more failed SSH attempts!
💻 First, Proxmox GUI
First things first, we’ll be working from within the Proxmox GUI. You most likely get there by typing the IP of the machine PVE is installed on, unless you have DNS setup - either way, navigate to the Proxmox GUI in your browser.
First, lets create a new PVE VM by clicking the ‘Create VM’ button.

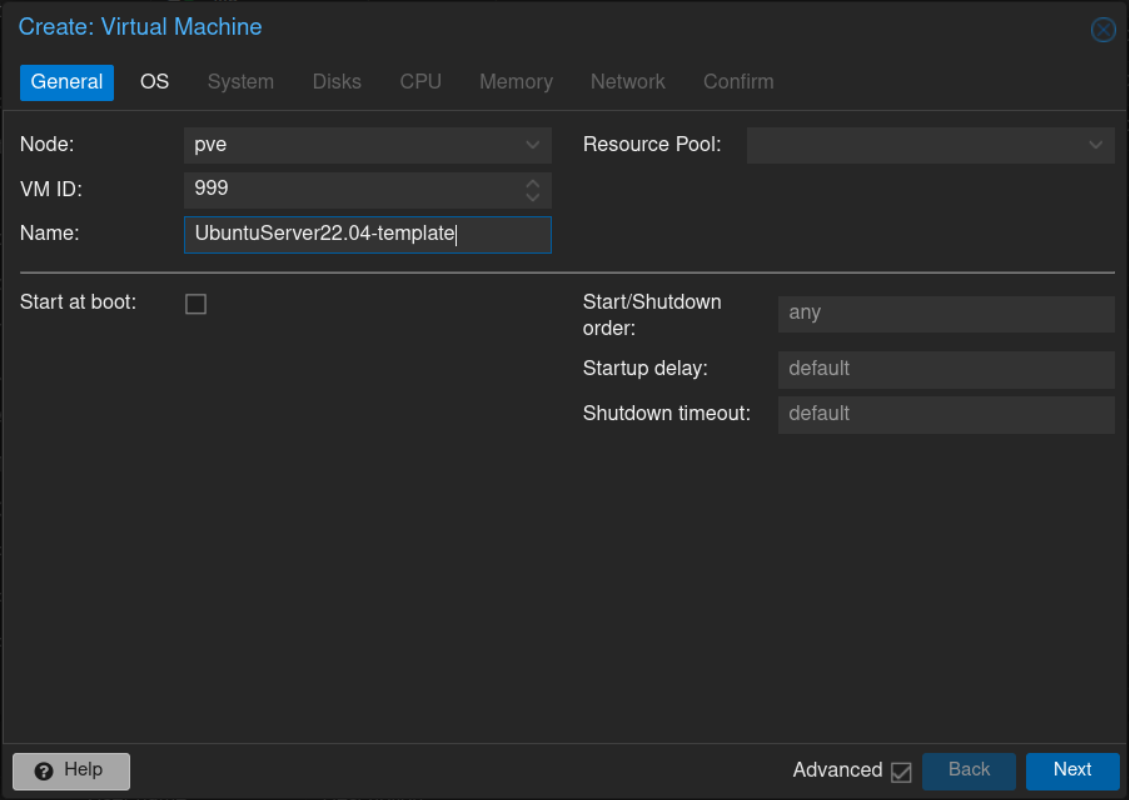
In the General tab, set the VM ID to 999 (so we can easily find it at the bottom of the list) and a Name of ‘UbuntuServer22.04-template’.
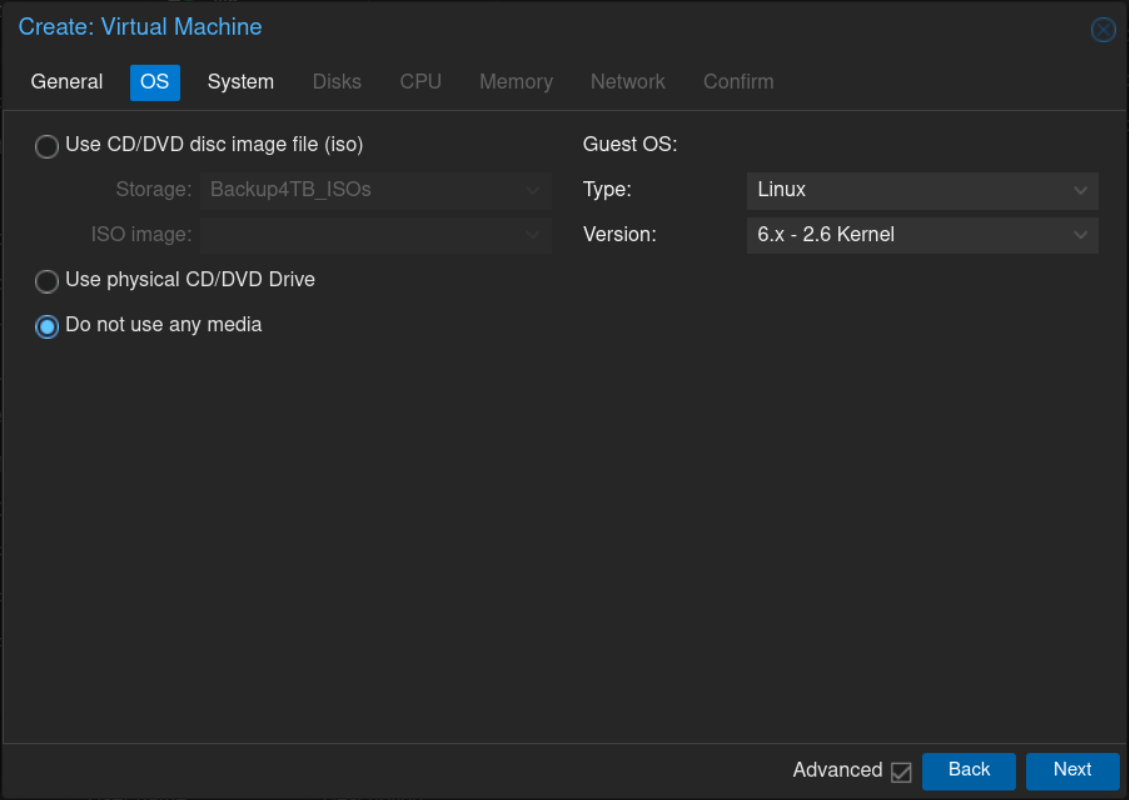
Click next, and on the OS tab we’ll Select ‘Do not use any media’ - as we’ll be converting an Ubuntu Cloud Image and don’t need any boot device.
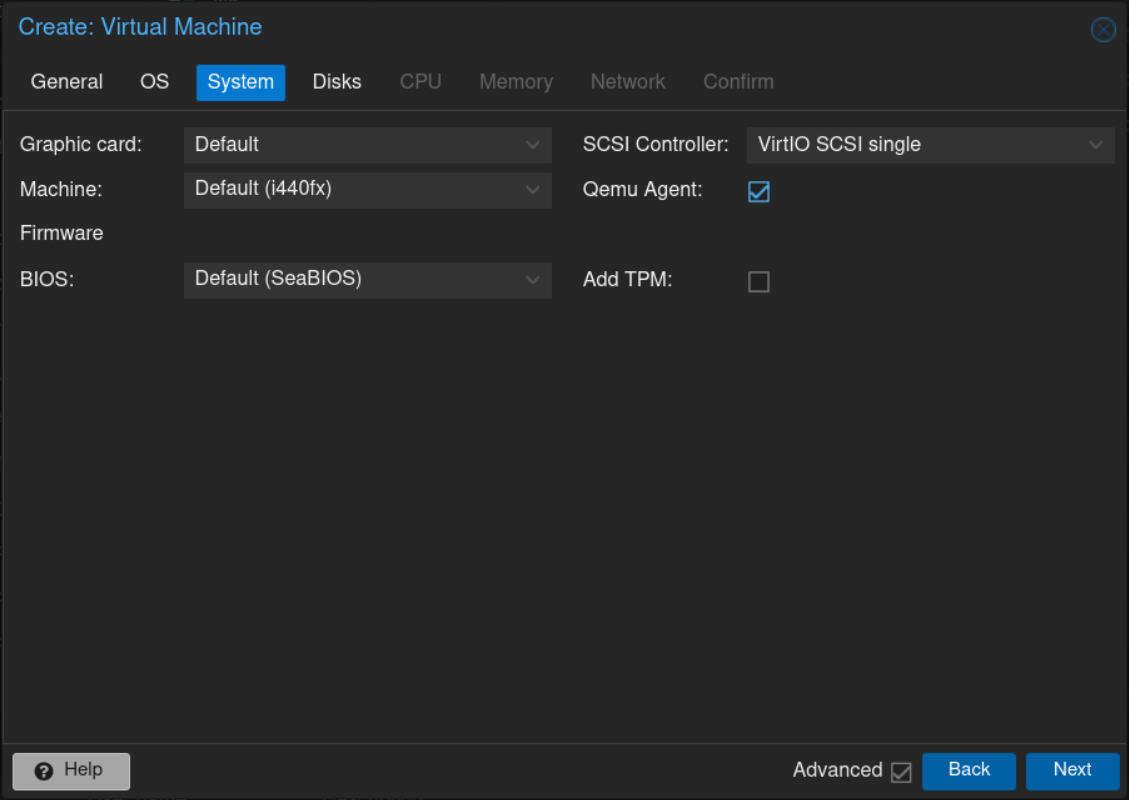
Click next, and on the System tab we’ll want to tick the ‘Qemu Agent’ box. This allows users to install the qemu-guest-agent package in Ubuntu so all Proxmox function buttons (shutdown/reset/etc) work correctly.
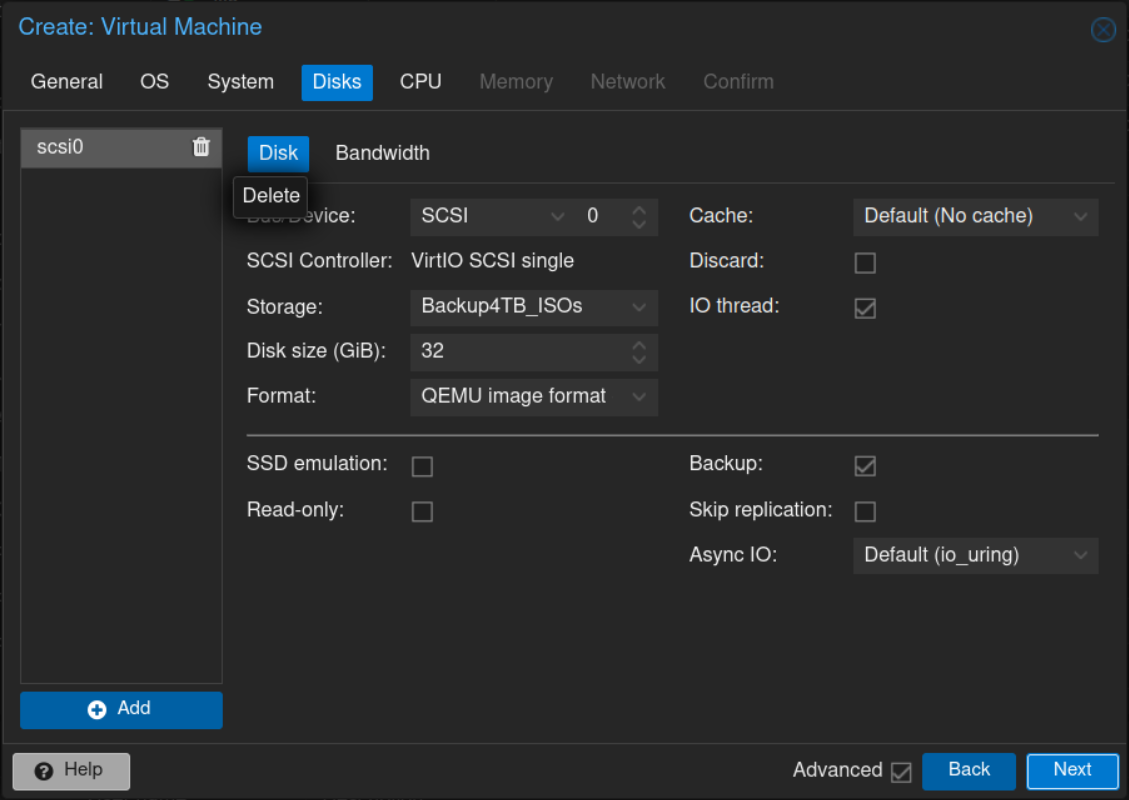
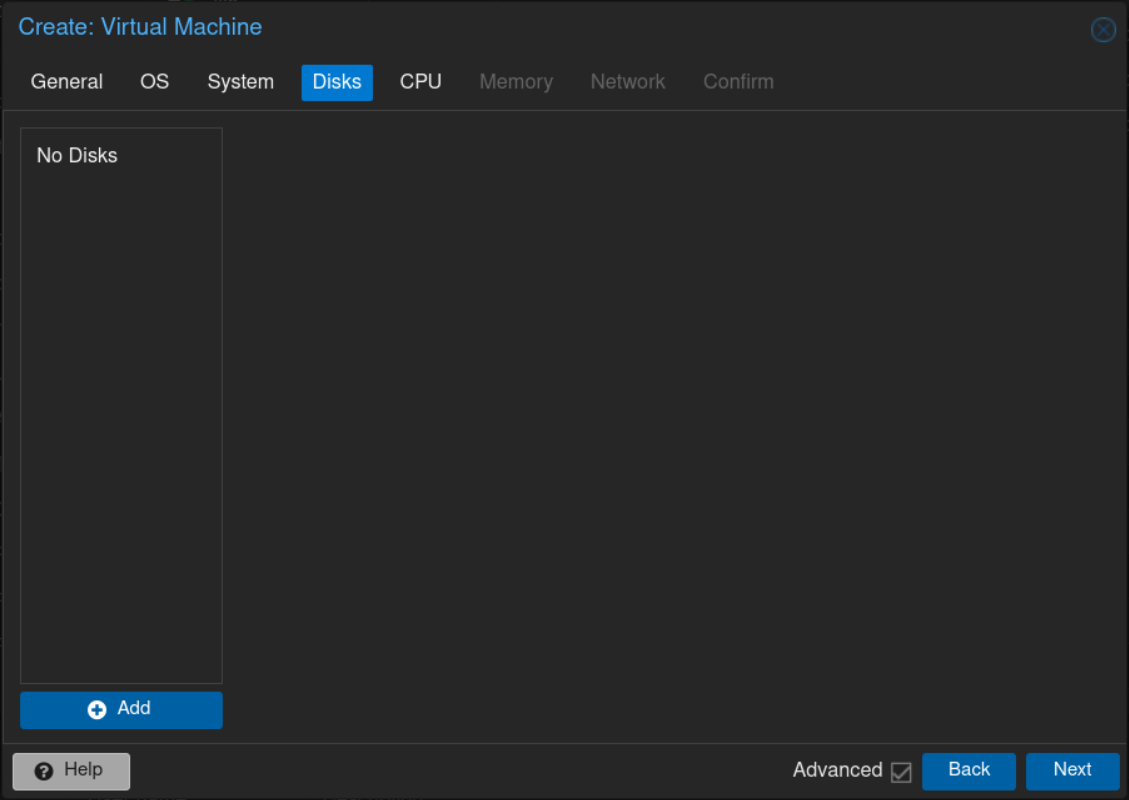
Click next; on the Disks tab we want to completely delete the ‘scsi0’ disk. Click the trash can icon, making sure the final picture shows no disks present.
After clicking the trash can, no disks are listed:
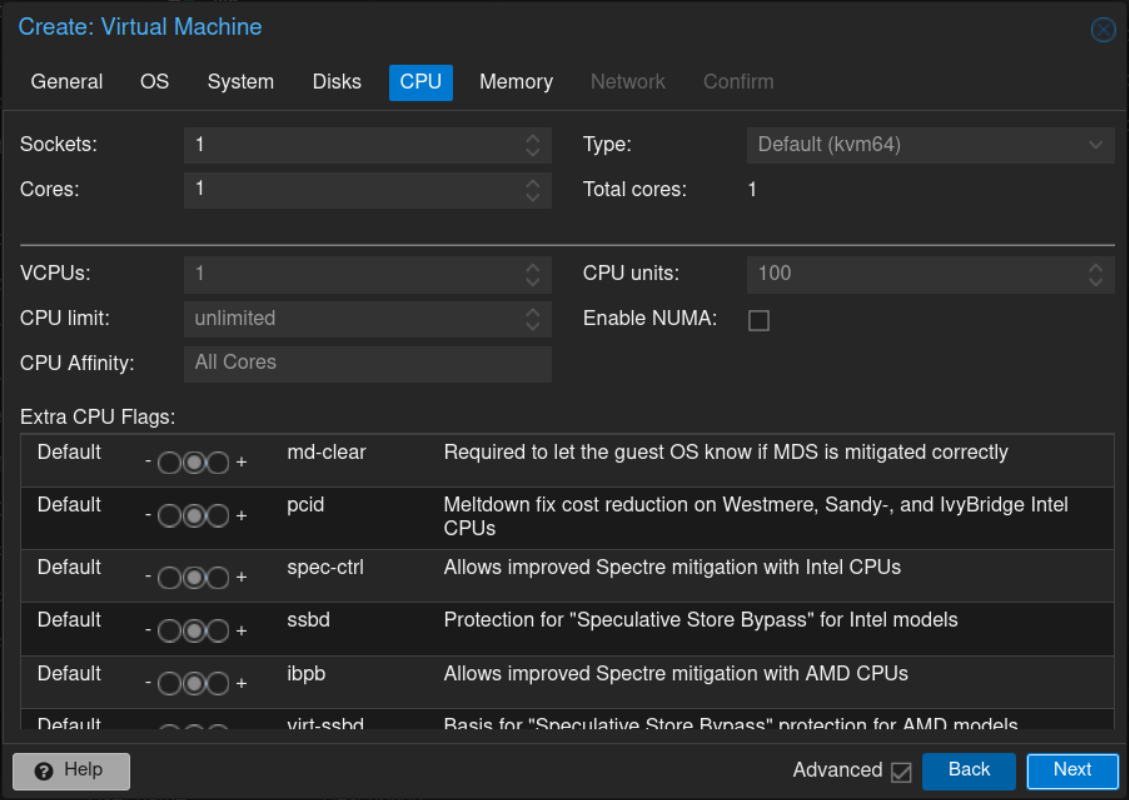
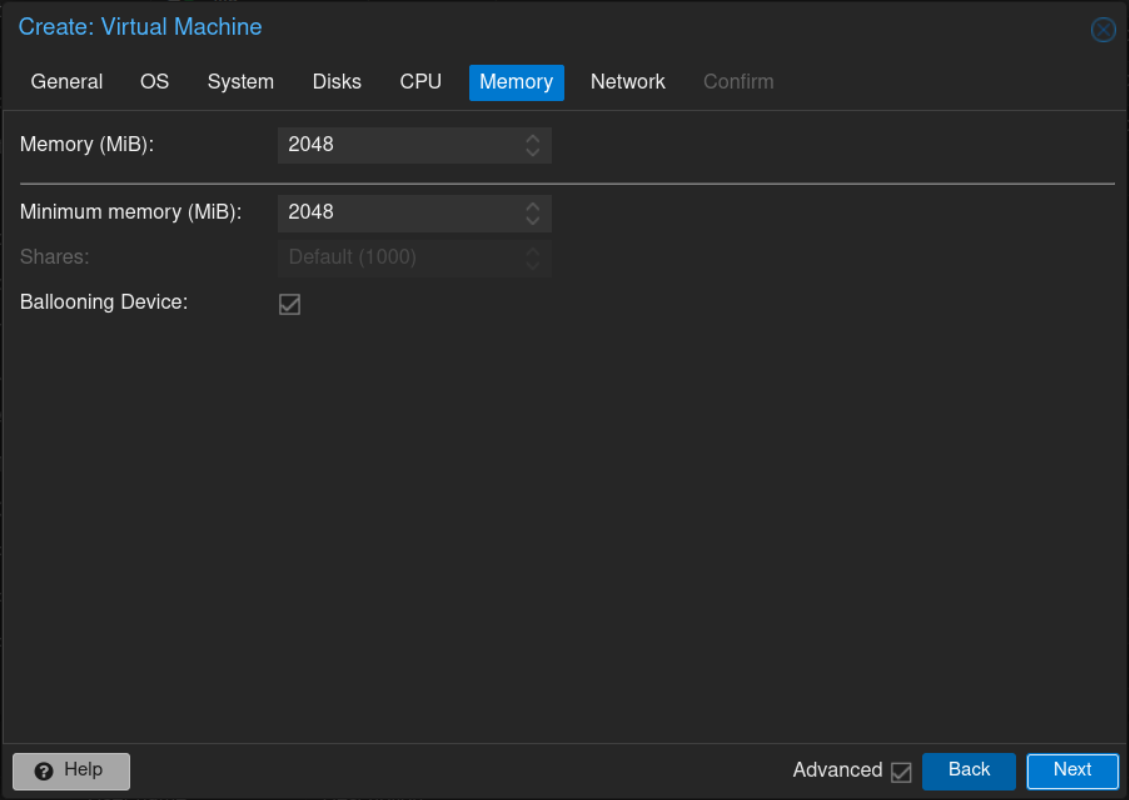
Click next, and on both the CPU and Memory tabs you can select the lowest settings that you’ll want for any VMs you clone from the template we create… I leave CPU Sockets & Cores at 1 and Memory at 2048. Later, after you create a clone from the Ubuntu template, you can change these settings before your first boot.
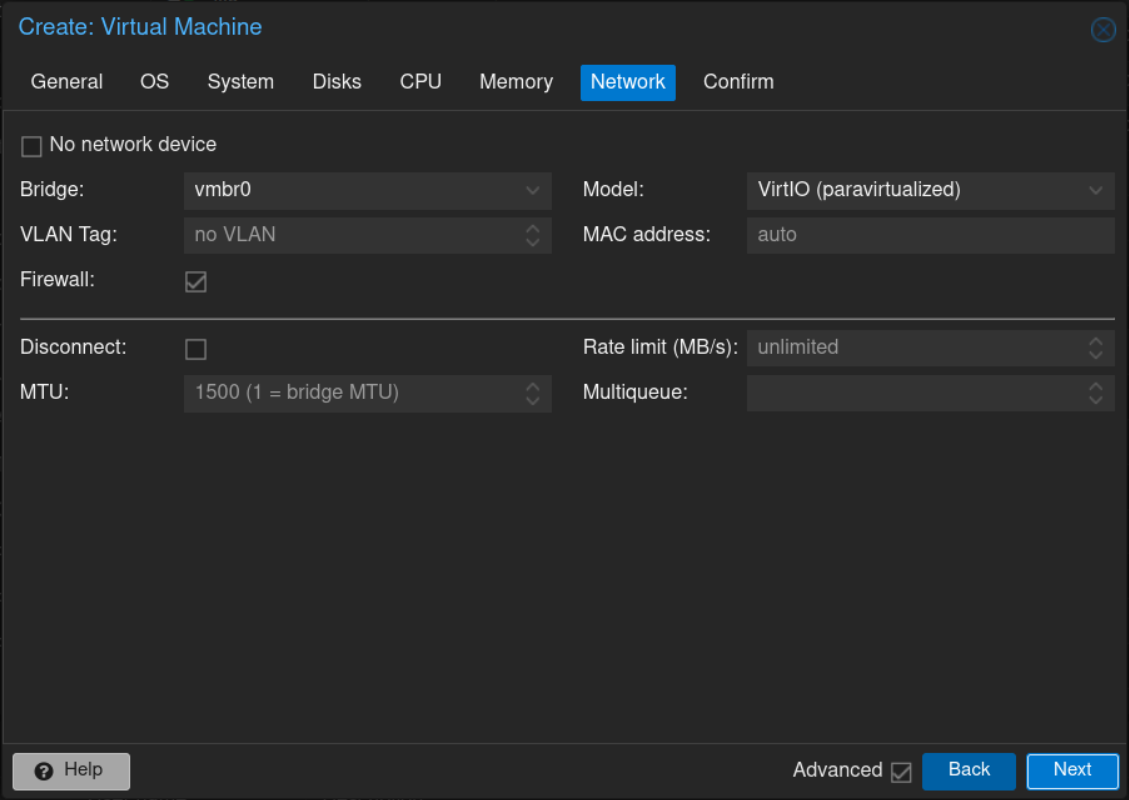
Click next again, and choose the network you want to use; most people won’t need changes (If you DO use subnets / other networks, you can select what you like..).
Alright; click next to review the settings!!
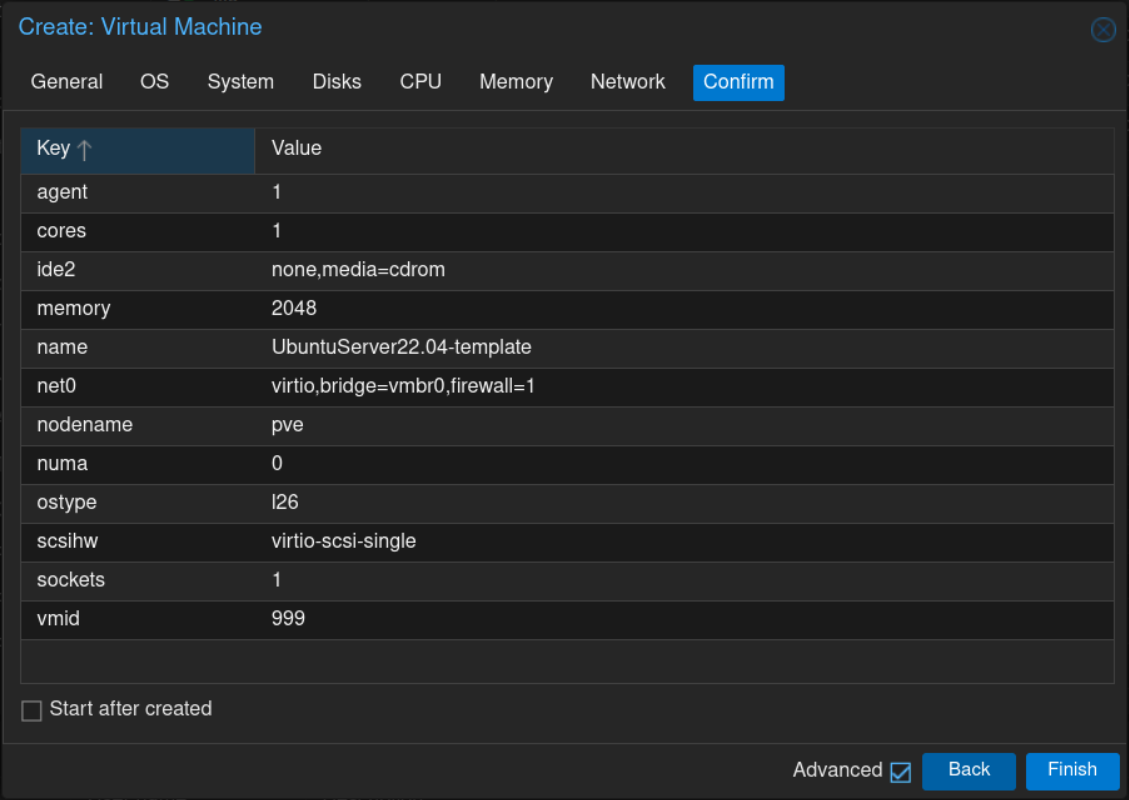
Click Finish!! You’ll notice, if you scroll down your VM list, that VM #999 is being created… when it finished, highlight it and select the ‘Hardware’ tab. Now, click the “Add” drop down menu and click the ‘CloudInit Drive’ option.
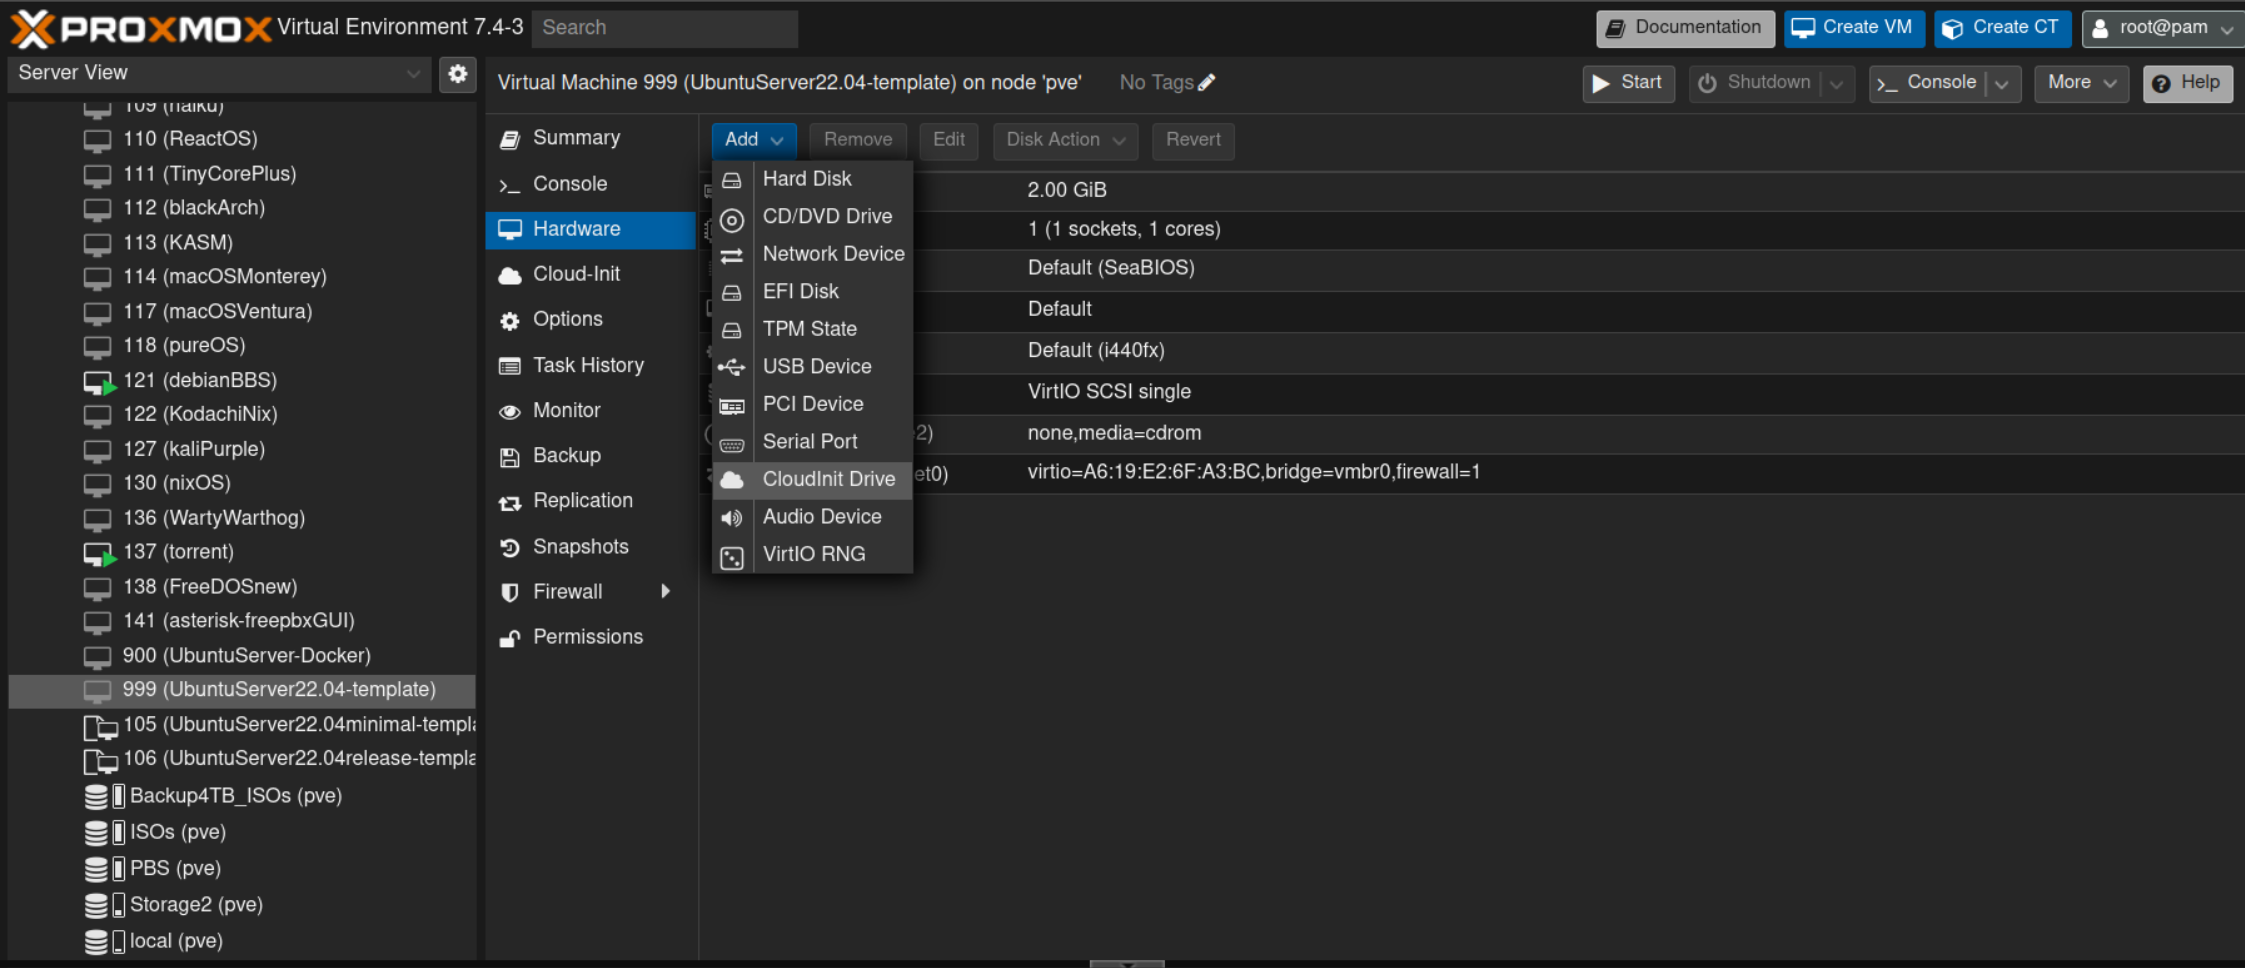
A CloudInit Drive allows you to set user, password, DNS and SSH keys when a VM first boots - when you later clone from the template we’re creating, you can change these settings as needed… you’ll have to select where you want to store this (very small) CloudInit Drive. For users with stock installations of Proxmox, this may be ’local-lvm’; for me, its ‘Storage2’, so I’ll select that location. You may select the format you prefer; I like the ‘QEMU Image Format .qcow2’ as its size expands as you use it.
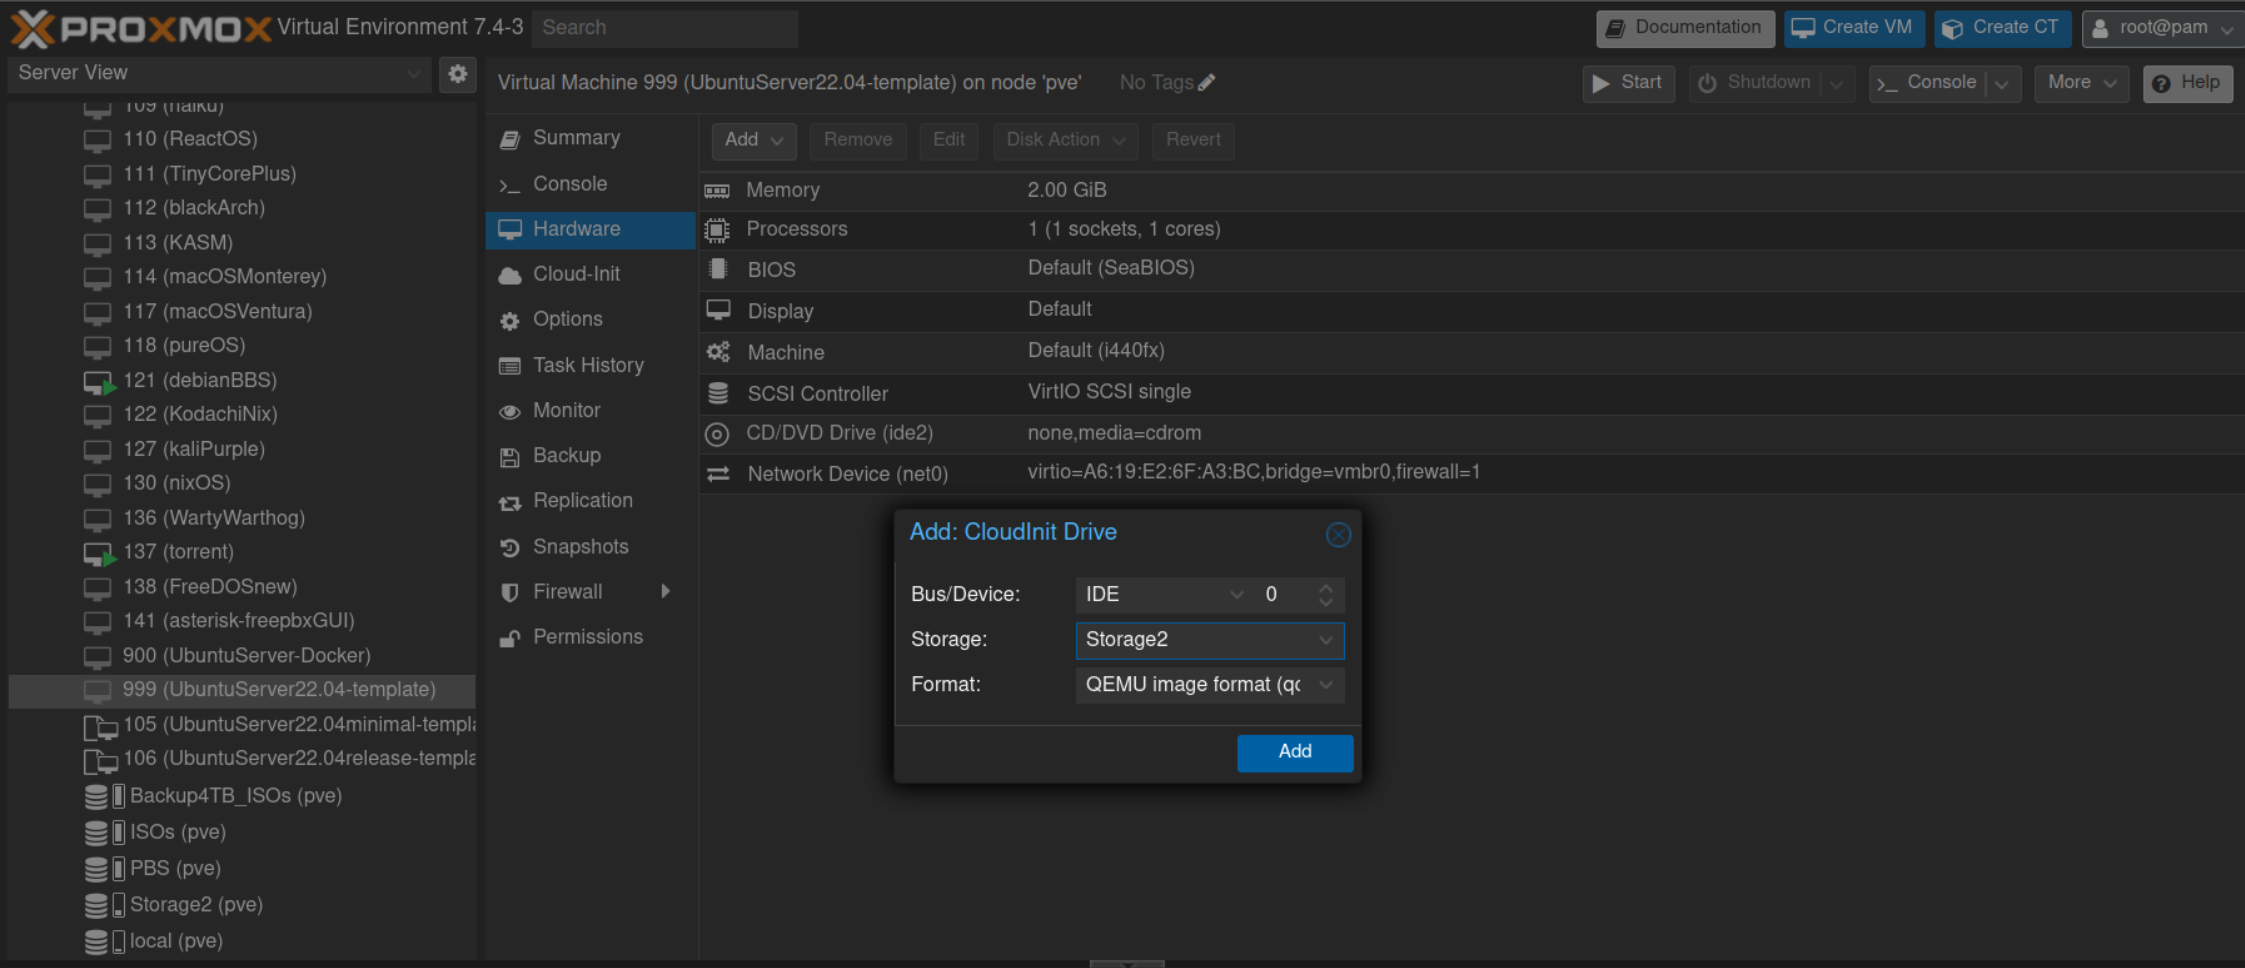
Click Add and we’ll move on… here’s text from the Proxmox Documentation explaining what CloudInit is useful for:
Cloud-Init is the de facto multi-distribution package that handles early
initialization of a virtual machine instance. Using Cloud-Init, configuration
of network devices and ssh keys on the hypervisor side is possible. When the VM
starts for the first time, the Cloud-Init software inside the VM will apply
those settings.
Now, select the Cloud-Init tab below Hardware.
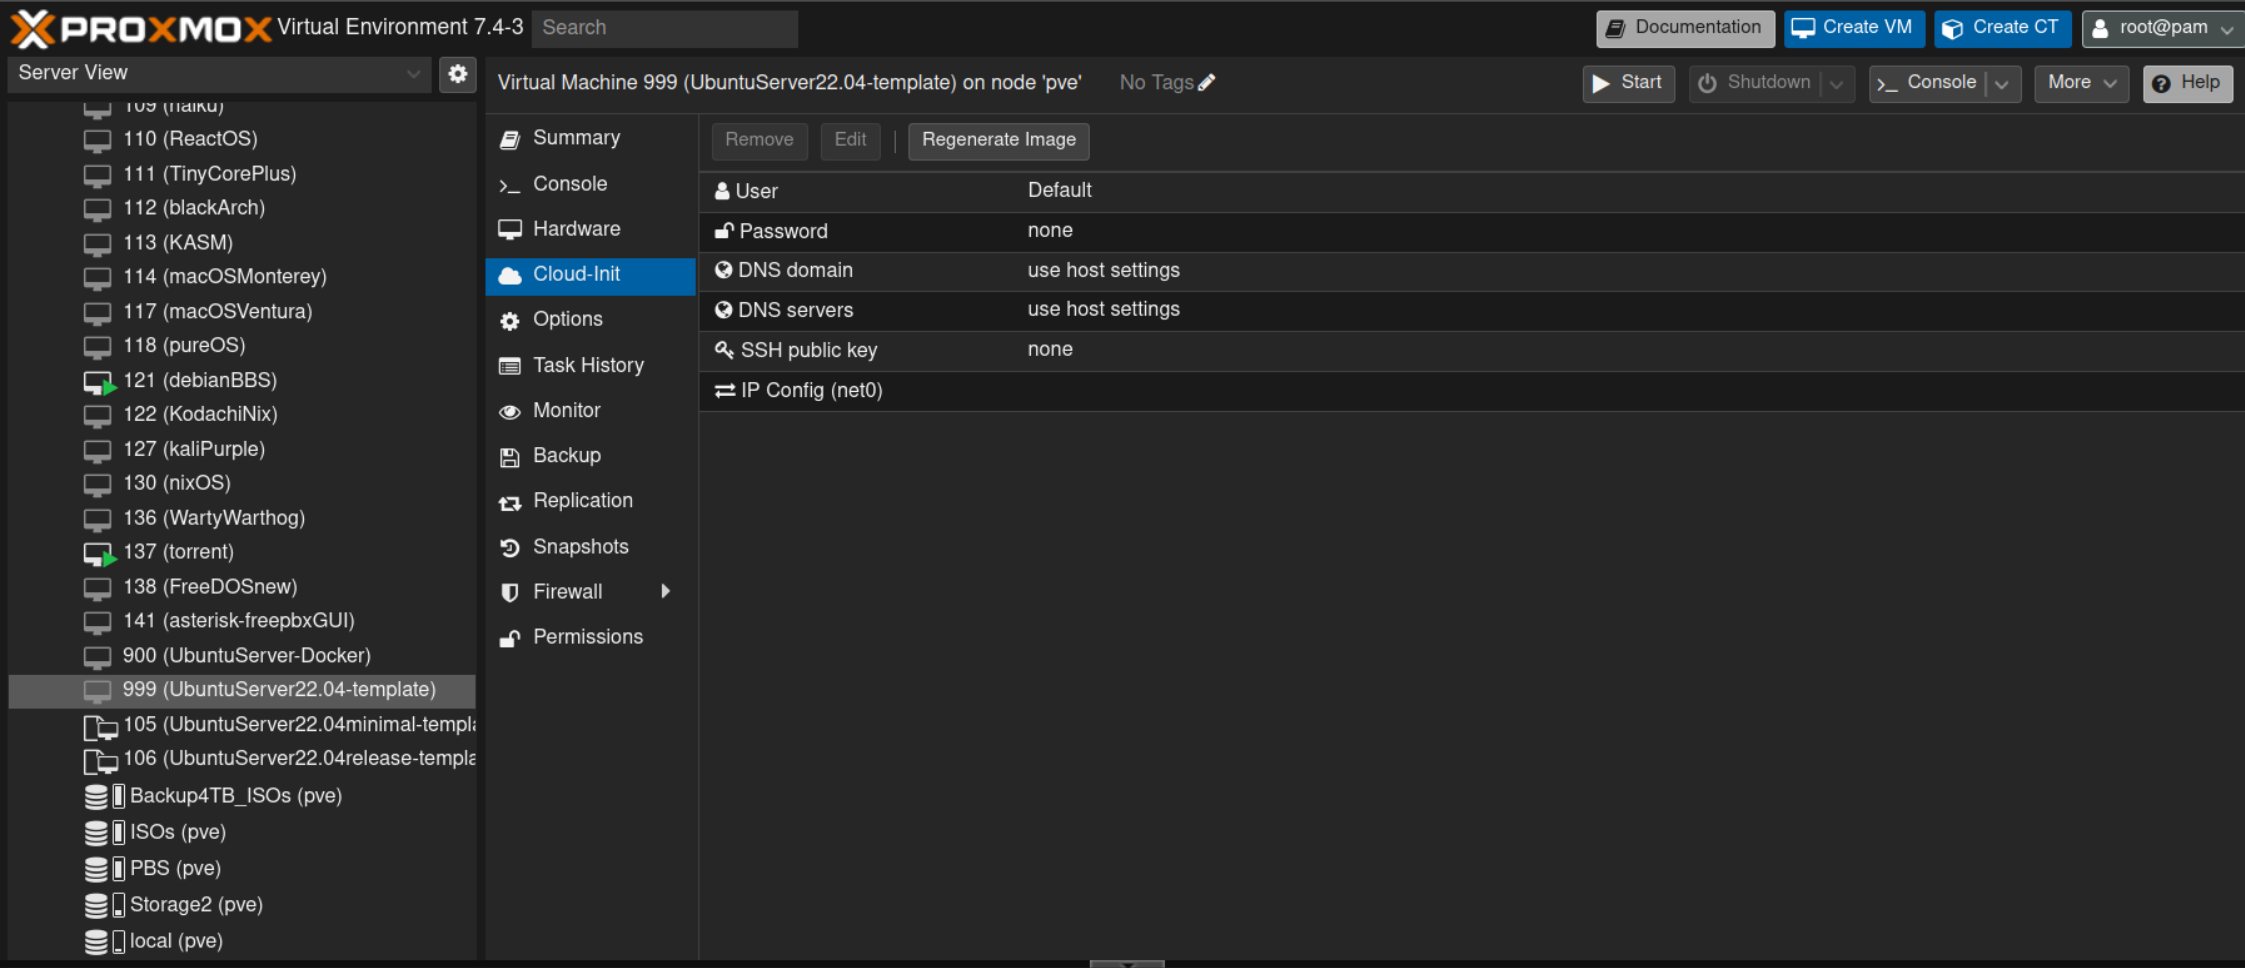
We’ll set a default user/password; this will be the user/password for cloned VMs-however you can CHANGE them if needed before you first boot a newly cloned VM.
Click ‘User’ and then the ‘Edit’ button above. Enter username.
Click ‘Password’ and then the ‘Edit’ button above. Enter password.
For IP Config, I like DHCP as a cloned VM will automatically get a new IP on first boot.
Click ‘IP Config’ and them the ‘Edit’ button above. Select the ‘DHCP’ button on IPv4.
Also, if you want a public SSH key you can add it now.
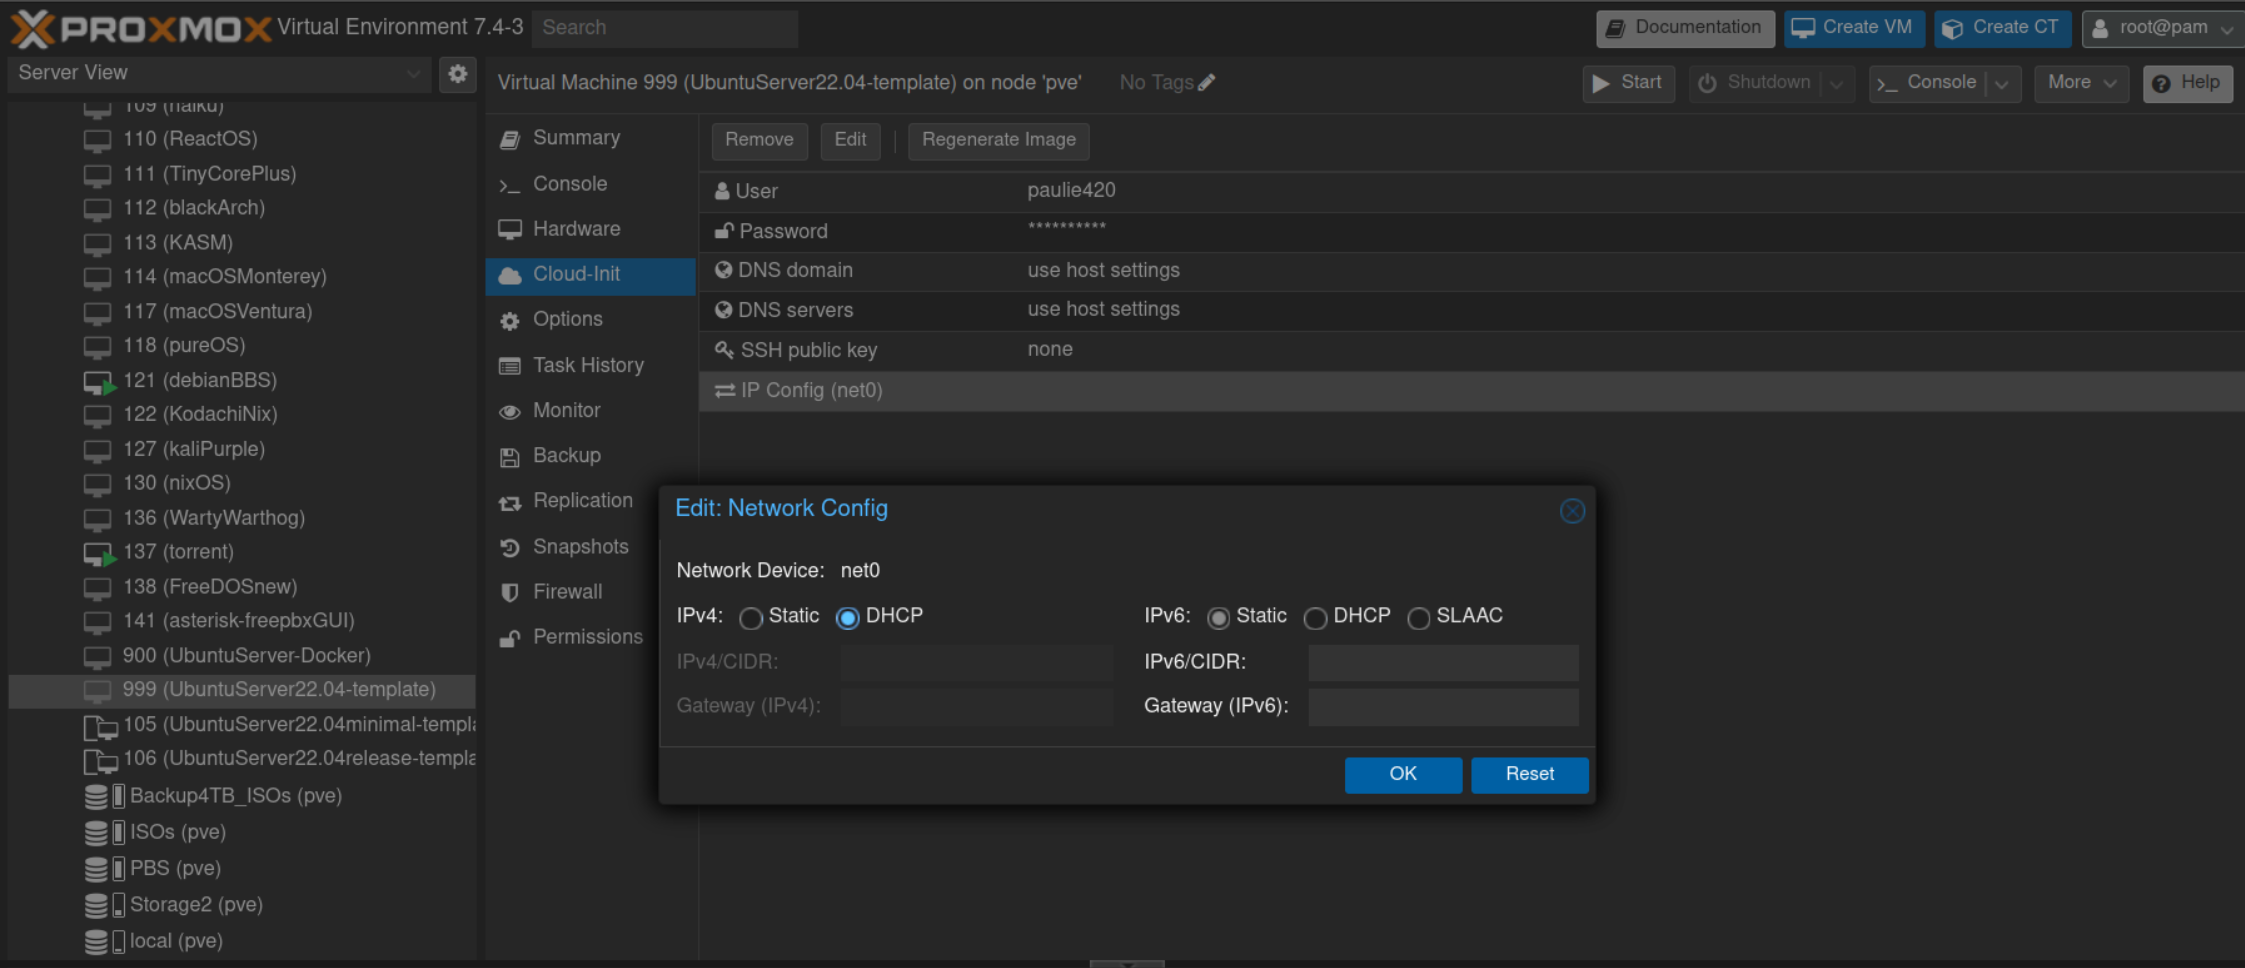
It’s important, after all those settings were changed, to click the “Regenerate Image” button; else, these changes won’t be written to a CloudInit Drive!!

⌨ Let’s dive into the TERMiNAL!
Here, you’ll need to SSH into your main Proxmox PVE machine. I use a user account with sudo access, but stock users will use their ‘root’ account.
ssh root@xxx.xxx.xxx.xxx
Alternatively, if you don’t have or know how to use SSH, you may use the Proxmox Shell - this is found by selecting your main PVE node (Usually right underneath “Datacenter” on the left most side of your PVE GUI.) and then tapping the “Shell” tab.
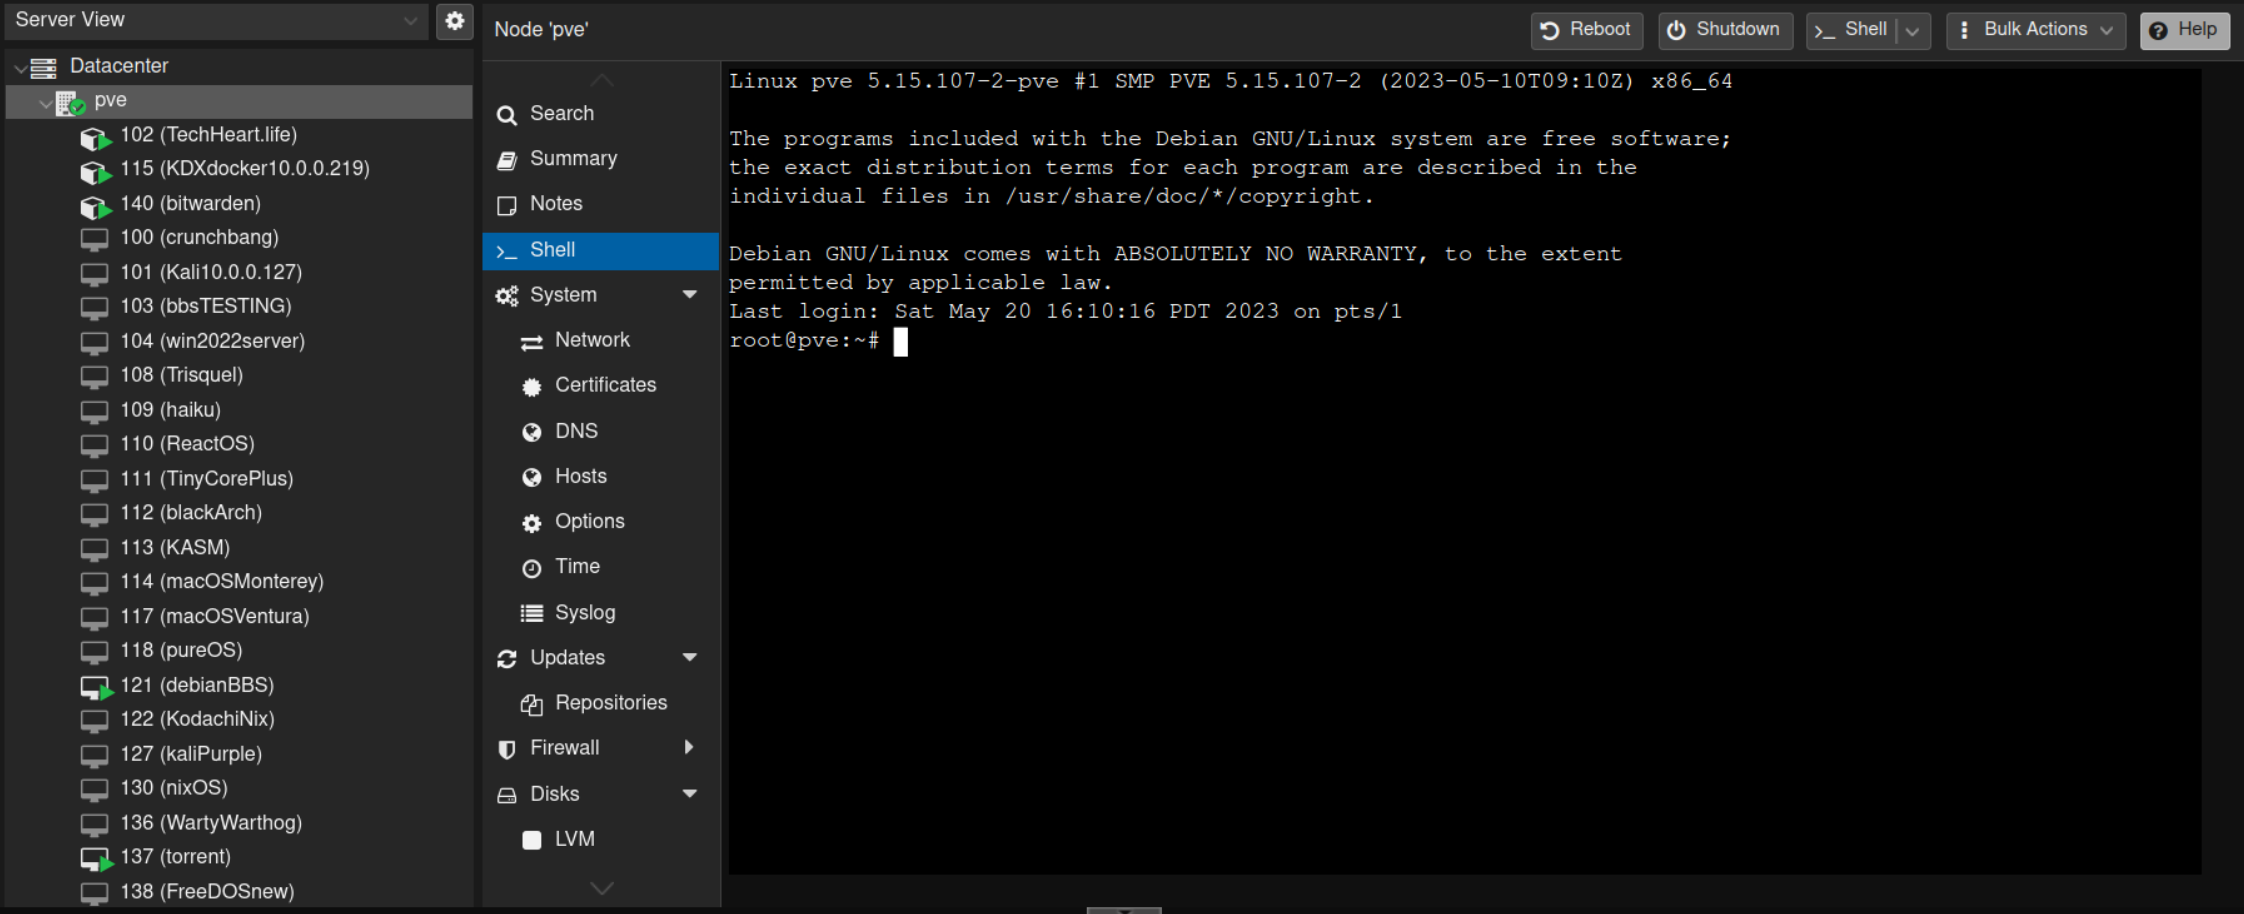
Either route you choose, you now are logged in to your main PVE machine with root (or sudo) access. The very first thing we need to do is check for the command ‘wget’. Type it into the terminal - if you don’t have wget, you can install it with:
apt update
apt install wget
(If you need sudo, type sudo before the apt commands.)
We’re using the Ubuntu Server 22.04 LTS Release .IMG… lets download that with wget:
wget https://cloud-images.ubuntu.com/releases/22.04/release/ubuntu-22.04-server-cloudimg-amd64.img
You should now have the file “ubuntu-22.04-server-cloudimg-amd64.img” in your ~/ directory - we need to make some changes to it so that it’s formatted correctly for PVE to use an a hard disk. First, we need to ‘convert’ it to the .qcow2 format:
mv ubuntu-22.04-server-cloudimg-amd64.img ubuntu-22.04-server-cloudimg-amd64.qcow2
Now you have the file “ubuntu-22.04-server-cloudimg-amd64.qcow2” in your ~/ directory… but now we’ll finish converting it. You have some choice here, as you can size it to your choosing. Remember, VMs you clone from the template we’re creating will have a hard disk in this size… I’m going to choose 128gigs, you can choose anything you like:
qemu-img resize ubuntu-22.04-server-cloudimg-amd64.qcow2 128G
If the command worked properly, you’ll see the output:
Image resized.
Lastly, we need to import this .qcow2 file into our VM. We use the following command, with some edits:
qm importdisk <VM ID> ubuntu-22.04-server-cloudimg-amd64.qcow2 <STORAGE NAME>
The two sections that need changing are “VM ID” and “STORAGE NAME”. If you’ve been following along verbatim, the “VM ID” is easy - its 999. However, remember when I mentioned that my storage name was “Storage2” and that some stock users might have “local-lvm”??? Well - yours will be where you stored your CloudInit Image. (Unless, of course, you know what you’re doing and have other storage options. Also, the ‘qm’ command is only present for a root user, so if you’re using a non-root you’ll need ‘sudo’; my command ended up being:
sudo qm importdisk 999 ubuntu-22.04-server-cloudimg-amd64.qcow2 Storage2
If the command imports the disk correctly, you’ll see output like:
importing disk 'ubuntu-22.04-server-cloudimg-amd64.qcow2' to VM 999 ...
Formatting '/mnt/storage2/images/999/vm-999-disk-0.raw', fmt=raw size=137438953472 preallocation=off
transferred 0.0 B of 128.0 GiB (0.00%)
 [snip]
transferred 128.0 GiB of 128.0 GiB (100.00%)
Successfully imported disk as 'unused0:Storage2:999/vm-999-disk-0.raw'
In fact, if you’d like to see the disk for yourself, you can run an ’ls’ command to doso: (Remember, I need sudo but you probably don’t - and, your storage won’t be ‘storage2’…)
sudo ls -all /mnt/storage2/images/999/
total 1543696
drwxr-----  2 root root         4096 May 28 15:28 .
drwxr-xr-x 30 root root         4096 May 28 14:58 ..
-rw-r-----  1 root root      4521984 May 28 14:58 vm-999-cloudinit.qcow2
-rw-r-----  1 root root 137438953472 May 28 15:28 vm-999-disk-0.raw
Lets delete the duplicate, now that we’ve imported it to the VM:
rm ubuntu-22.04-server-cloudimg-amd64.qcow2
Another ‘issue’ we should deal with is that… when you boot from a Cloud-Init drive like we’ve setup, the VM boots headlessly. You wouldn’t see anything in your console or pop-up window if we don’t enter the following command:
qm set <VM ID> --serial0 socket --vga serial0
Remember to change “VM ID” to 999, or your VM #, and add ‘sudo’ before the command, if needed:
sudo qm set 999 --serial0 socket --vga serial0
update VM 999: -serial0 socket -vga serial0
💻 w00t!!, back to Proxmox GUI!!
Select the “UbuntuServer22.04-template” VM, which is 999 if yer following verbatim, and click the “Hardware” tab.
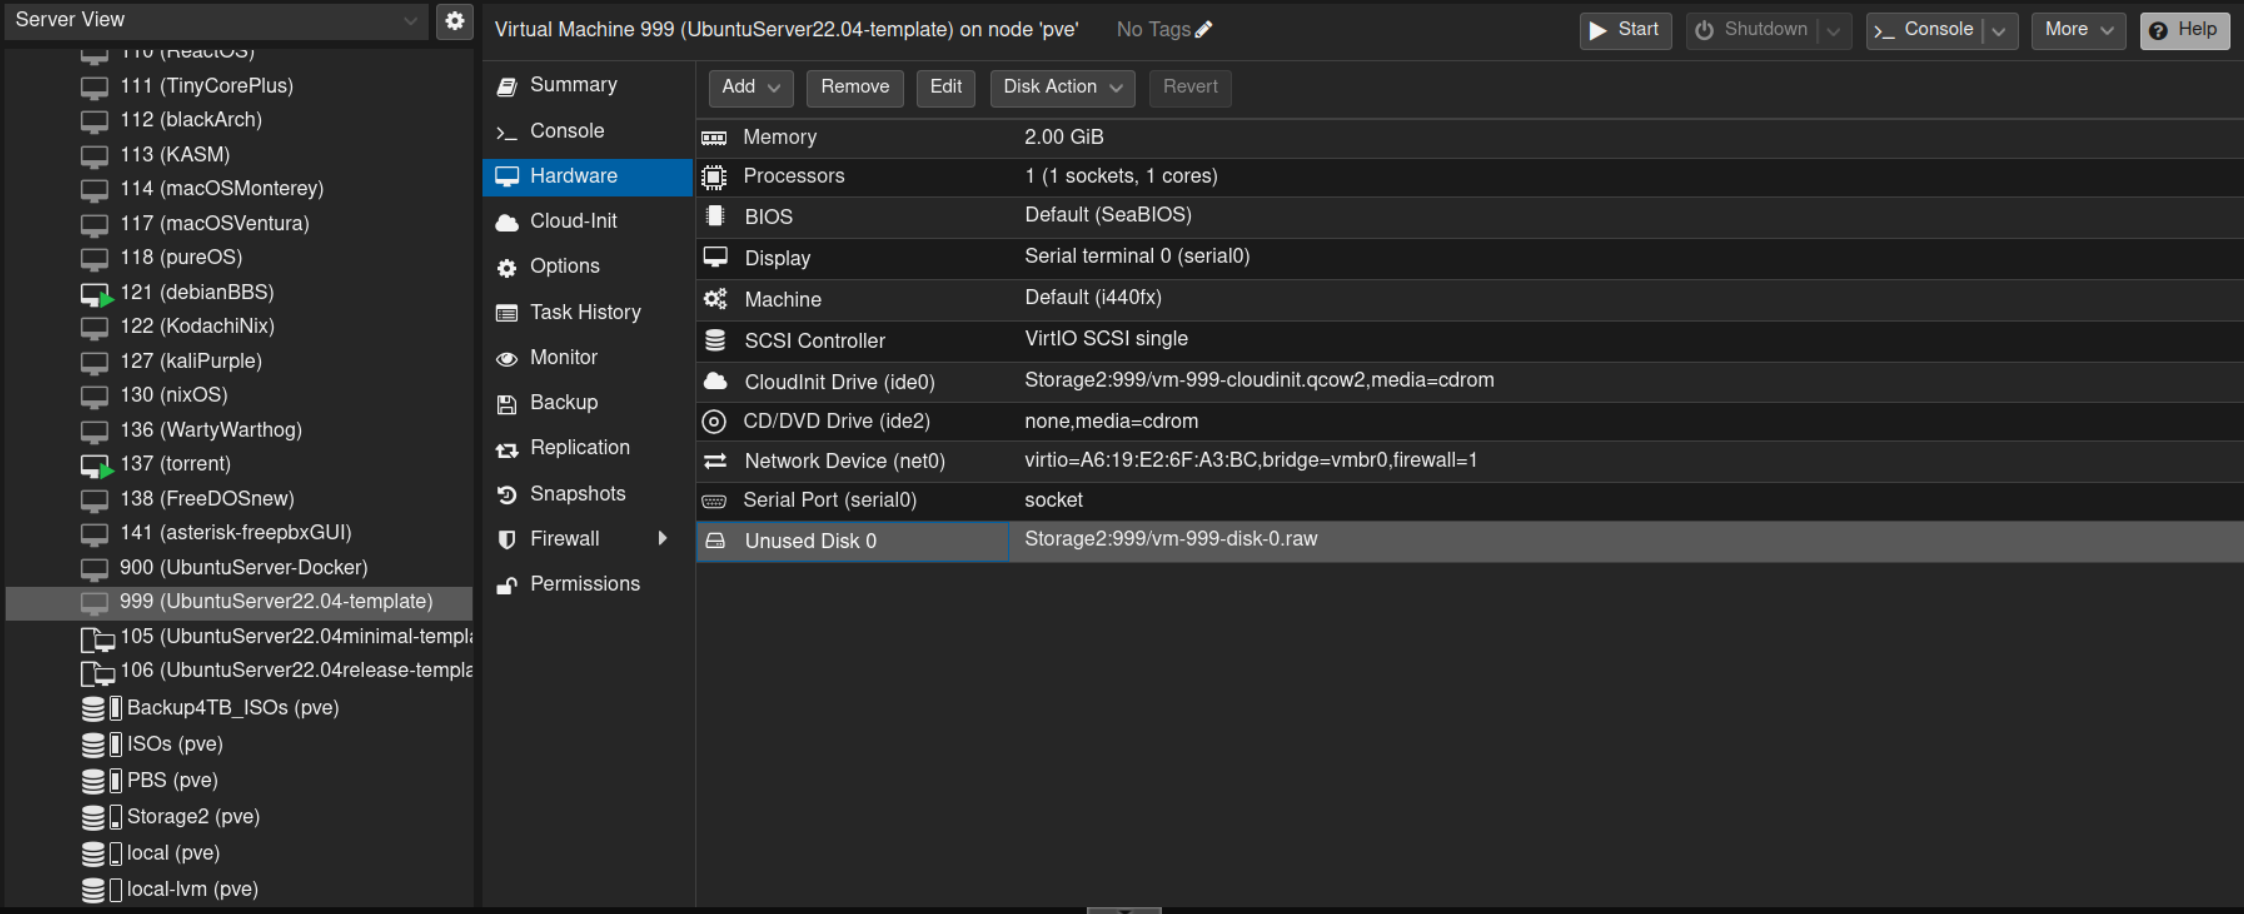
You’ll notice a new ‘Unused Disk 0’ at the bottom of the Hardware Tab list - anyone know what this is?? Its the Ubuntu Release Image that we downloaded, converted and imported… but right now PVE isn’t using it:
Select ‘Unused Disk 0’, tap ‘Edit’ at the top and finally click ‘Add’ in the window that pops up…
(NOTE: If the HDD of your storage pool is an SSD, you should also click the ‘Discard’ box, open the ‘Advanced’ section and click the ‘SSD emulation’ box, too..)
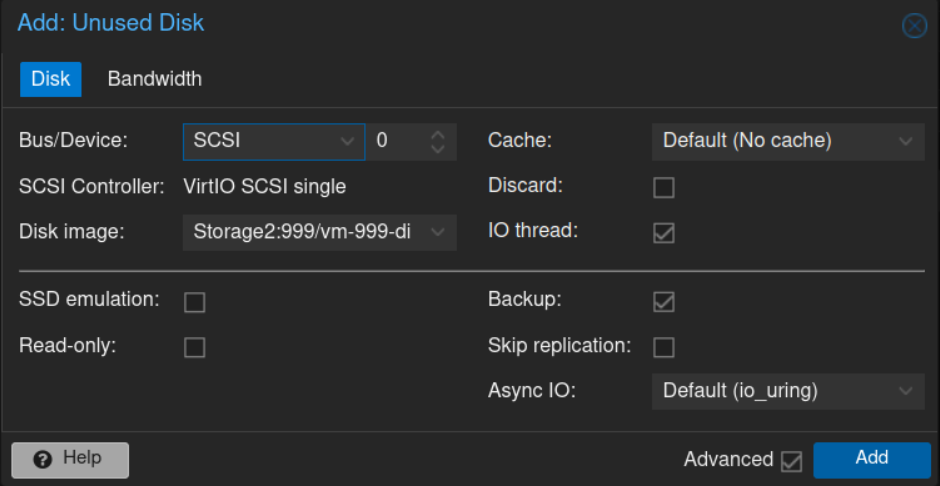
Now we’ve added the Unused Disk 0 to a Hard Disk - almost there… we’ll have to change the Boot Order since currently the VM would boot to ide2 first.
Click the ‘Options’ tab of VM 999 and then select ‘Boot Order’… click ‘Edit’ at the top of the screen.
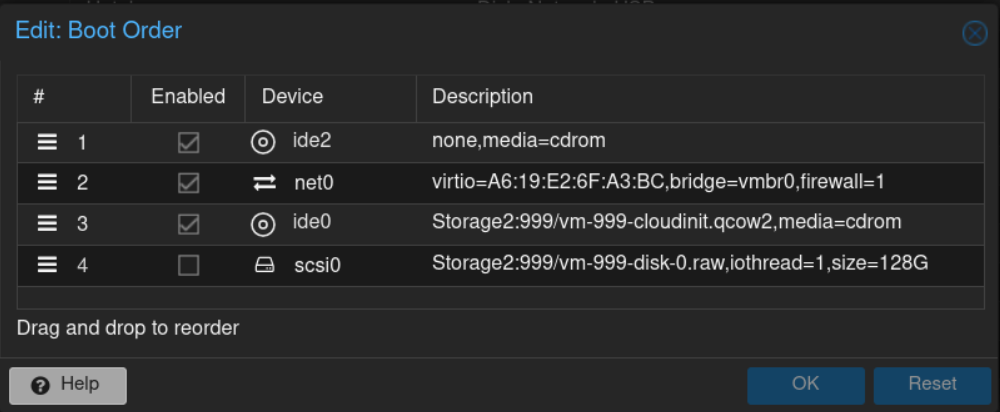
First, enable the Hard Drive we just added; its box is currently empty, click it so its ticked and Enabled. Then, drag it from position 4 to position 2… this fixes our boot order:
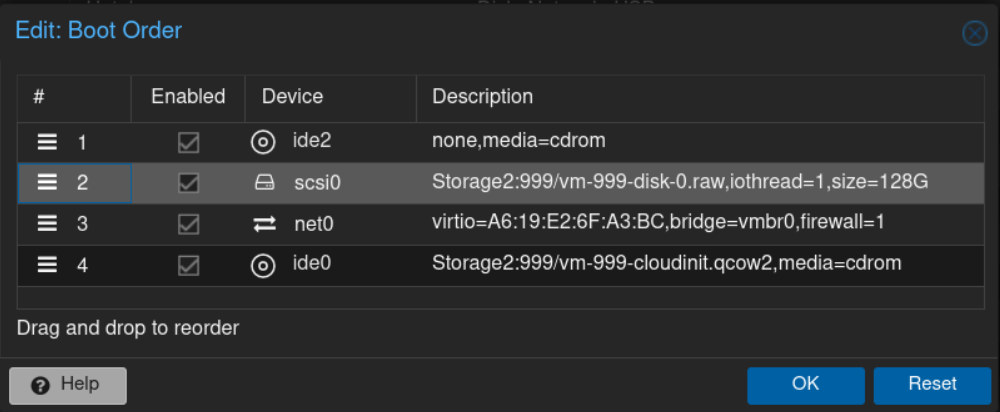
Notice that now all ‘Enabled’ boxes are checked, and the boot order is:
1.ide2  CD-Rom
2.scsi0 Hard Disk
3.net0  Network
4.ide0  CloudInit
🏃 The finish line!
OK - we’re ready to convert this VM to a template. Once you convert, however, it’s not easy to change a template back to a VM… there may be other options you’d like selected or changed… one could be ‘Start at boot’, which means any VM you clone from the template would auto-boot if PVE goes down… or, any other settings that you prefer your VMs to have. I suggest going thru all the options of this UbuntuServer22.04-template VM before you do the final conversion.
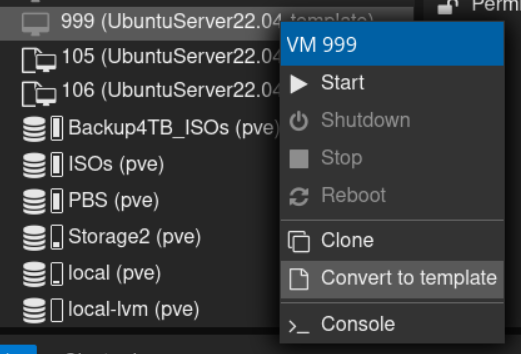
When ready, select the ‘UbuntuServer22.04-template’ VM and right-click it. Click the ‘Convert to template’ option and finally ‘Yes’ - PVE will convert this VM to a template!
…
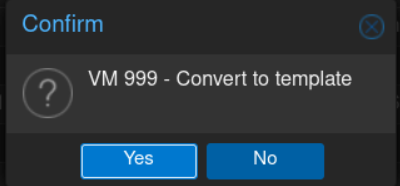
After confirming, Proxmox will take a moment converting the VM to a template:

You can now right-click UbuntuServer22.04-template and select ‘Clone’ to create a VM from it! There are two types of cloned VMs, ‘Linked Clone’ and ‘Full Clone’. Full is a complete, separate, clone. Here’s text from the Proxmox Documentation explaining the different types of clones:
Full Clone

A full clone VM is a complete copy and is fully independent from the original
VM or VM Template, but it requires the same disk space as the original.

Linked Clone

A linked clone VM requires less disk space but cannot run without access to the
base VM Template.
Linked Clones works for theses storages: files in raw, qcow2, vmdk format
(either on local storage or nfs); LVM-thin, ZFS, rbd, sheepdog, nexenta.
It's not supported with LVM & ISCSI storage.
I’ll create a full clone - just give it a VM ID and a NAME and click ‘Clone’. Check the VM ID you selected and you’ll see it appear!
The awesome thing about using both the Ubuntu Minimal Cloud image and Cloud-Init is that when you create two clones, they each have a unique IP and MAC address; you can change the Cloud-Init options of the template before cloning to create different user/password combos, network options or SSH key inclusions!
The last thing to be aware of is after cloning a Cloud-Init template, make sure you give the first boot extra time to complete the Cloud-Init setup. Cloud-Init does an update/upgrade, creates a user and sets up networking. You MAY get a login prompt before its complete… you’ll know its done when you see:
[ OK ] Reached target Cloud-Init target.
Another oddity is that sometimes the first login attempt will fail with a wrong password reply - I can’t figure this out, but the second attempt succeeds as normal.
PS: Don’t forget to install qemu-guest-agent - it allows PVE functions like Shutdown VM to work properly:
sudo apt install qemu-guest-agent
PROFIT.